Dev Notes
How to Build a Unity Skidmark Effect Using Vehicle Skidmarks and a Unity Particle Trail System
A convincing skidmark effect for vehicles in Unity3D is deceptively easy to fake and surprisingly easy to get wrong. Rubber flattening under braking, drifting, or a rough landing needs to look continuous, follow the wheel's exact contact point, and fade at a believable rate rather than sit frozen on the road forever. This guide works through a complete Unity skidmark effect, starting from the engine's built-in TrailRenderer component and building out a Unity trail renderer skidmark setup that drops onto any wheeled vehicle. Along the way it covers vehicle skidmarks, a Unity particle trail layer for lifted dust and rubber smoke, and the handful of mistakes that make skid marks look like they're floating six inches above the pavement.
None of this requires a custom shader or a physics plugin. It requires one component most Unity projects already ship with, a small script to decide when a wheel is actually slipping, and some patience with the width curve.
Why Vehicle Skidmarks Matter in Combat and Racing Games
Skid marks are one of the cheapest forms of feedback a driving or vehicle-combat game can give a player. A dark streak under a fishtailing rear wheel tells the player, instantly, that they lost traction, without a HUD element or a sound cue getting in the way. In a vehicle-combat context, where a hit or a destroyed wheel can suddenly change how a chassis handles, that streak becomes diagnostic information as much as decoration.
Missing it is noticeable too. Strip the skid marks out of a build and grey-box test footage looks oddly sterile, like the tires never touch the ground at all.
Trail Renderer Unity Basics: Adding the Component
A trail renderer Unity component only draws a ribbon behind a moving transform; the wheel-contact logic underneath it is entirely your own code. Add a TrailRenderer to an empty child object positioned at each wheel's likely contact point, then configure four properties before anything else:
time— how long, in seconds, a given point stays visible before it's dropped from the trailwidthCurve— usually a flat 6–10cm width for a car tire, tapering to zero at the tail so old segments don't end in a hard edgeminVertexDistance— the minimum distance the object must move before a new trail vertex is added; too low and the mesh generates far more geometry than the shape needsmaterial— a simple unlit, alpha-blended black or dark-grey texture works for asphalt; anything glossier reads as wet paint rather than rubber
Nearly every trail renderer Unity script for vehicles ends up sharing the same three settings: time, width curve, and minimum vertex distance. Everything past that is tuning, not architecture.
Emitting Only From the Real Contact Point
The trail object should sit at the wheel's contact point with the ground, not at the wheel's pivot. For a WheelCollider-based setup, that point comes from WheelHit.point, sampled every frame the wheel is grounded. Parenting the trail directly to the wheel mesh and letting it spin with the tire is a common early mistake; a spinning trail anchor produces a wobbling, corkscrewed mark instead of a flat one.
Building the Unity Skidmark Effect Step by Step
The actual decision of when to draw a mark comes down to slip, not speed. A wheel can be moving quickly with perfect traction, or nearly stationary and spinning uselessly on ice; only the slip values distinguish the two. WheelHit exposes both a forward slip and a sideways slip value, and either crossing a threshold is enough to justify a mark:
public class WheelSkidmark : MonoBehaviour
{
    [SerializeField] private TrailRenderer trail;
    [SerializeField] private WheelCollider wheel;
    [SerializeField] private float slipThreshold = 0.4f;
    [SerializeField] private float contactOffset = 0.01f;

    void Update()
    {
        if (!wheel.GetGroundHit(out WheelHit hit))
        {
            trail.emitting = false;
            return;
        }

        bool isSlipping = Mathf.Abs(hit.forwardSlip) > slipThreshold
                        || Mathf.Abs(hit.sidewaysSlip) > slipThreshold;

        trail.emitting = isSlipping;
        transform.position = hit.point + hit.normal * contactOffset;
    }
}
That's the whole mechanism. The contactOffset lifts the trail a centimeter off the surface to dodge z-fighting with the road mesh, and emitting is toggled rather than the GameObject itself, so the existing trail keeps fading naturally instead of vanishing the instant a wheel regains grip.
Tuning the Slip Threshold
A threshold around 0.3–0.5 is a reasonable starting point for an arcade-leaning vehicle, and it's worth exposing it per wheel rather than as one global constant. A rear-wheel-drive car under hard acceleration slips its back wheels well before the front ones; a single shared threshold either mutes the rear marks or triggers front marks that never should have appeared.
Positioning and Fading Vehicle Skidmarks Realistically
Vehicle skidmarks read as fake in two specific ways: floating above the surface, or ending abruptly instead of fading. The floating problem is almost always a stale contact point, either because the offset is too large or because the trail updates on a frame where the wheel briefly reports not grounded. The abrupt-ending problem is a time value set too short for the pacing of the level; a value under two seconds barely survives a single corner before disappearing mid-turn.
A short digression worth having: some older racing titles skipped mesh-based trails entirely and projected a decal texture straight onto the road under each tire instead. It's cheaper per frame and handles slopes and stairs more gracefully, but it doesn't curve with the vehicle's path the way a trail mesh does, and it needs its own decal-management system to avoid overdraw. TrailRenderer remains the simpler default unless a project already has a decal pipeline for other reasons.
TrailRenderer fades the whole mesh uniformly over time seconds; it does not fade older segments faster than newer ones by default. A visually convincing taper needs either a gradient on the material's alpha channel or a custom shader reading vertex age.
Adding a Unity Particle Trail for Smoke and Debris
A Unity particle trail layered on top of the mesh trail sells the effect at higher speeds, where a flat black ribbon alone reads as a decal rather than burning rubber. A small ParticleSystem set to emit only while the wheel is slipping, using roughly the same slip check as the trail, adds drifting dust or smoke without any extra physics work:
public class WheelDust : MonoBehaviour
{
    [SerializeField] private ParticleSystem dust;
    [SerializeField] private TrailRenderer trail;

    void LateUpdate()
    {
        var emission = dust.emission;
        emission.enabled = trail.emitting;
    }
}
Any Unity particle trail vehicle setup benefits from capping the emission rate rather than leaving it uncapped; four wheels each spawning fifty particles a second adds up fast on a track with several AI-driven cars. A rate of ten to twenty particles per second per wheel, with a short one-second lifetime, is usually enough to read as dust without becoming its own performance line item.
Profiling the Skidmark System
A trail system that looks cheap in isolation can still show up in the profiler once a full grid of AI vehicles is drifting at once. The capture below is from an early build, caught mid-GC.Collect spike with Skidmarks.LateUpdate() highlighted in the frame breakdown.
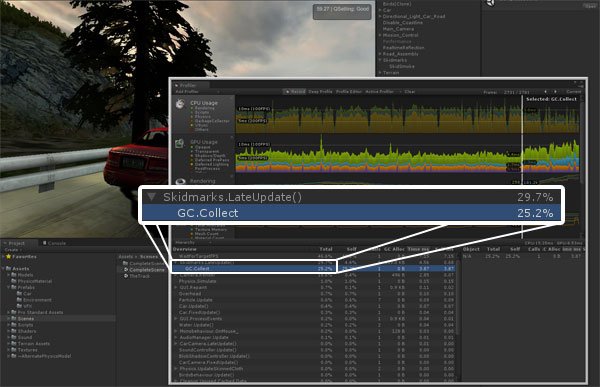
A spike shaped like that one is almost always a per-frame allocation somewhere in the trail update path, most commonly a fresh Vector3[] or List<T> built inside LateUpdate instead of reused across frames. TrailRenderer itself doesn't allocate on its own once configured; the garbage almost always comes from surrounding script code, not the component. Caching buffers at the pool level, per object pooling, removes it at the source rather than tuning it away frame by frame.
Common Skidmark Rendering Pitfalls
Marks That Tear on Sharp Turns
A trail's minimum vertex distance interacts badly with very tight turning radii. If the distance threshold is large relative to how fast the contact point changes direction, the trail draws long straight segments through what should be a curve, producing a faceted or torn look. Lowering minVertexDistance fixes it at the cost of more geometry, which is a fair trade for most vehicle counts.
Four Wheels, One Shared Mesh
It's tempting to reuse a single TrailRenderer and reposition it across all four wheel contact points in sequence, but TrailRenderer only tracks one continuous path. Four wheels need four separate trail objects; sharing one produces an unreadable zigzag connecting wheel to wheel every frame.
Pooling Trail Objects
On a track with many AI vehicles, spawning and destroying trail GameObjects every time a car respawns or resets adds avoidable garbage collection pressure. Developers on Unity Discussions have raised exactly this concern around skidmark pooling, since a naive per-collision instantiate-and-destroy pattern scales badly once a dozen cars are drifting at once. Reusing a small pool of trail objects, and calling Clear() on a trail before reassigning it to a different wheel, avoids the churn; the general technique is covered in more depth in the Unity object pooling guide.
Marks That Don't Match the Tire's Width
A width curve copied from a tutorial rarely matches an actual project's tire model. A wide monster-truck tire and a narrow racing slick shouldn't draw the same skid mark, but it's easy to leave widthCurve at whatever value first looked reasonable and never revisit it once other wheels get added. Driving the width from the wheel's actual collider radius, rather than a hardcoded constant, keeps the mark visually attached to the tire it came from even as a vehicle's parts change mid-match.
Testing Skidmark Rendering Without a Full Vehicle Build
Waiting on a complete driving controller before checking whether the skid marks themselves look right slows iteration down for no good reason. A small test rig, a single GameObject moved by a script along a scripted path with an artificially toggled slip flag, isolates the trail and particle behavior entirely from the physics and input code:
public class SkidmarkTestRig : MonoBehaviour
{
    [SerializeField] private TrailRenderer trail;
    [SerializeField] private float radius = 5f;
    [SerializeField] private float speed = 2f;

    float angle;

    void Update()
    {
        angle += speed * Time.deltaTime;
        transform.position = new Vector3(Mathf.Cos(angle), 0f, Mathf.Sin(angle)) * radius;
        trail.emitting = Mathf.Sin(angle * 3f) > 0f;
    }
}
Circling a fixed point while toggling emitting on and off exposes fade timing, width tapering, and z-fighting issues in isolation, well before a single line of vehicle physics exists. It's a five-minute script that saves a lot of guessing later.
Applying Skidmarks to Modular Vehicle Combat Games
A modular vehicle combat game complicates the picture slightly, because the vehicle's mass, wheel count, and grip characteristics can all change mid-match as parts get destroyed or bolted on. A skidmark system built around fixed per-wheel prefabs handles this reasonably well as long as trail objects attach to whatever wheel sockets exist on the current chassis rather than to a hardcoded four-wheel assumption. A vehicle skidmark effect Unity3D games from the mid-2010s tended to hardcode four wheels; a build-a-vehicle game with variable wheel counts needs the trail-spawning logic to iterate over the vehicle's actual wheel list instead.
This vehicle skidmark effect Unity3D approach also has to account for weapon damage changing a wheel's grip mid-drift, which is really just the slip threshold reacting to whatever the physics layer already reports; no separate damage-aware skid code is required if the WheelCollider's own friction curves are already being adjusted elsewhere.
Frequently Asked Questions
What is a Unity skidmark effect, technically?
A Unity skidmark effect is a strip mesh drawn behind a wheel's contact point while the wheel is losing traction, typically built with a TrailRenderer and driven by slip data from a WheelCollider. It is not a decal, a shader effect, or a physics feature on its own.
How does TrailRenderer create a vehicle skidmark effect?
TrailRenderer stores a history of positions for the object it's attached to and builds a ribbon mesh connecting them, fading it out after a set number of seconds. Pointing it at a wheel's ground contact point and toggling its emitting property based on slip turns that generic ribbon into a vehicle skidmark effect.
Do I need a separate TrailRenderer per wheel?
Yes. TrailRenderer tracks a single continuous path, so reusing one instance across multiple wheel contact points produces a mark that jumps between wheels instead of four separate, independent marks. Each wheel needs its own trail object, pooled if the vehicle count is high.
How do I only draw skid marks when a wheel is actually slipping?
Read WheelHit.forwardSlip and WheelHit.sidewaysSlip from WheelCollider.GetGroundHit() each frame, and set TrailRenderer.emitting to true only when either value exceeds a chosen threshold, usually somewhere between 0.3 and 0.5.
Which TrailRenderer settings matter most for vehicle skidmarks?
time controls how long a mark lingers, widthCurve controls tire width and tapering, and minVertexDistance controls how faceted or smooth the mark looks on tight turns. Most other settings can stay at their defaults.
Can I use a Unity particle trail instead of a mesh trail?
A Unity particle trail works for smoke, dust, and sparks, but it's a poor substitute for the flat ground mark itself, since particles don't reliably conform to a road surface the way a trail mesh does. The two are usually combined rather than swapped for one another.
How do I fade out old skidmarks smoothly?
TrailRenderer fades the entire mesh evenly across its time window rather than fading each segment individually. For a per-segment fade that looks like rubber wearing away, apply a gradient alpha texture along the trail's length, or drive alpha from a custom shader keyed to vertex age.
Why do my skidmarks appear to float above the ground?
This is almost always a contact-point offset that's set too large, or the trail updating on a frame where GetGroundHit briefly returns false and the last valid position gets reused instead of a fresh one. Keep the offset in the 0.5–1cm range and skip trail updates entirely when the wheel isn't grounded.
Why does the trail tear or zigzag on sharp corners?
minVertexDistance is too high relative to how quickly the contact point changes direction during the turn. Lowering it produces smoother curves at the cost of a slightly heavier trail mesh.
How should I pool skidmark trail objects for performance?
Keep a small pool of trail GameObjects per vehicle archetype rather than instantiating and destroying them on respawn. Call TrailRenderer.Clear() before reassigning a pooled trail to a new wheel so it doesn't drag a leftover mark from its previous owner.
Does WheelCollider give me the ground contact point I need?
Yes, via WheelCollider.GetGroundHit(out WheelHit hit), which returns a WheelHit struct containing point, normal, forwardSlip, and sidewaysSlip. It only returns true while the wheel is actually touching a surface.
Do skid marks work correctly on sloped or uneven terrain?
They do, as long as the trail follows WheelHit.normal rather than a fixed world-up vector when positioning itself. Orienting the trail to the surface normal keeps the mark flush with slopes instead of standing at an odd angle relative to the ground.
Is TrailRenderer expensive on mobile hardware?
TrailRenderer itself is lightweight; the cost usually comes from minVertexDistance set too low, generating far more geometry than necessary, or from too many simultaneous trails on screen. Raising the vertex distance slightly and pooling trail objects keeps it comfortable on mobile.
Should skid marks persist after a vehicle respawns or the level reloads?
Most vehicle games clear them on respawn by calling Clear() on the affected trail, since old marks from a destroyed vehicle rarely add useful information for the next attempt. Persisting them across a whole match is possible but requires baking finished trails into a shared decal texture rather than leaving hundreds of live TrailRenderer components active.
Does a skid mark need a custom shader, or does a standard unlit material work?
A standard unlit, alpha-blended material is enough for the vast majority of vehicle skidmarks. A custom shader only becomes worthwhile for a per-segment fade gradient or for blending the mark's color with the surface it's drawn over, neither of which is necessary to ship a convincing effect.
Does this approach work for a Rigidbody-based car without WheelCollider?
Yes, as long as something else supplies a comparable slip signal. A Rigidbody-only vehicle can compare its velocity direction against its forward vector, or raycast down from each wheel position to estimate contact and surface normal, and feed that into the same TrailRenderer toggling logic described above.
Conclusion
Four settings on a stock TrailRenderer, one slip check against WheelCollider data, and a pool of reusable trail objects cover the vast majority of what a Unity skidmark effect needs. This Unity trail renderer skidmark approach scales to a full grid of AI cars without much extra work, and any Unity particle trail vehicle layer stacked on top of it is a refinement worth adding only once the base mark already looks right at 60 wheels a second.